Preparing curtains
Making curtains is something everyone can do, provided that you adopt a suitable methodology and follow a few basic rules. Follow the guide!
Tips before getting started
Before cutting the fabric and beginning to make the curtains, you must wash, dry and iron it. In fact, a linen or cotton fabric can shrink by 5 to 10% when washed. If the horizontal edge of the fabric has not been cut completely straight by the manufacturer, correct this by drawing a line perpendicular to the edge using a ruler and a pencil. If a panel is to be formed of several lengths, pin them paying careful attention to the joining of the pattern and, in the case of double curtains, to their symmetry. Tack the fabric if it is slipping, pick and then overcast the seams and press them open with an iron if possible.
The different curtain headings
- Curtains with eyelets
- Curtains with a gathered hook tape
- Curtains with tabs or loops
- Curtains hung on tension wire
- Curtains with knots
- Slide top curtains
- Curtains with pinched pleats
- Attaching a lining
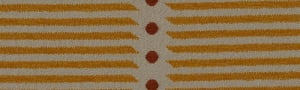
Curtains with eyelets

As the easiest finish to achieve, curtains with eyelets have become a classic feature in contemporary design. Eyelets sewn directly into the fabric create a nice, even wave and a nice, simple and elegant drop.
- Begin by calculating the required number of eyelets. For rings with a 7 cm diameter, it is preferable that you adhere to a maximum spacing of 15 cm and, if possible, that you install an even number of eyelets.
- Position the first hem 1 cm from the edges, then a second 8 cm down from the top of the curtain.
- Position a pin 1.5 cm in and then every 15 cm (in keeping with the spacing of the eyelets).
- Position the ring so that the space between the top of the ring and the edge of the curtain is always the same (1.5 cm)
- Using an HB pencil, trace around the inside edge of the ring.
- Cut out the traced circles using scissors. Insert the male part (the part with the largest centre) on the reverse side.
- Clip the female part in place.
- Stitch the bottom hem then feed the curtain onto the rail.
Curtains with a gathered hook tape
The hook tape curtain really is a classic. The curtain tape is slightly rigid, which enables you to create ruffles and attach the hooks.
- Buy a length of tape equivalent to the width of the curtain + 2 cm. The fixing method depends on the style of curtain rail.
- Fold down the top of the curtain by 8 to 10 cm.
- Attach the tape along the top edge of the curtain. It is generally sewn 2 cm from the edge, however, this can vary depending on the type of fixture.
- If you are using a metallic rail with sliding hooks, the top section must be wide enough to conceal the fixtures.
- If installing a rail using attractive wooden rings, you can leave them visible by sewing the tape 1 mm from the top of the curtain.
- Stop sewing before the end of the tape, as this will allow you to cut and fold it over before finishing stitching. Pull out the cords and stitch the top and bottom of the tape 1 mm from the edge.
- Pull the cords to gather the curtains, adjusting them based in how thick you want the pleats to be, then knot them.
- Slide in the hooks at regular intervals along the tape. The curtain is finished.
Variation: curtains with a tape and a pinched top
This curtain heading consists of double or triple pleats regularly spaced along the top of the curtain. Each large pinched pleat is divided into two or three small pleats, evenly sized. The pleated curtain heading is one of the most commonly used finished. This type of heading can be adapted to suit all kinds of rail. Traditionally these pleats are hand sewn. A curtain hook is attached to each pleat on the reverse side. You can achieve a similar result using a curtain tape. You must first buy:
- Tape for the pinched heading. This is a special tape with gaps.
- Special hooks forming a four-pronged fork. Each prong slides into one of the gaps to form small pleats (figure 1) A spacing of 10 to 15 cm between each hook is recommended.
- Two hooks for the edges (figure 2).
Adjusting the width of the panels.
- Begin by inserting the hooks
- Insert a single-pronged hook at the edge.
- At 12 cm, insert the 4 prongs of a hook, leaving two gaps between each prong.
- Leave two gaps and position another hook.
- Continue until you are about 12 cm from the other edge,
- Measure the achieved result.
- If it is too long, shorten the tape as required.
- If it is two short then space out the hooks.
Curtains with tabs or loops
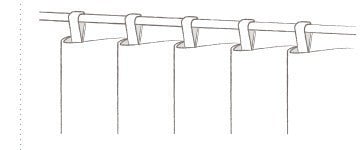 Plain, double, tapered with a pompom or other decorative feature - tabs are an easy way to add a touch of interest. A different fabric can be used for the tabs for a sophisticated and original finish. This finish gives the curtain an even wave and an impeccable straight drop and is also equally suited for when making linings and net curtains. It is possible to buy ready-made strips for making tabs, or they can easily be made from scratch. Here we suggest a design that features a decorative panel at the top of the curtain. The values stated are intended as a rough guide. They can be adjusted to keep the curtains in proportion.
- The tabs: cut strips that are 24 cm wide and 11 cm long. This includes 1 cm margins.
- The panel: 40 cm long and 115 cm wide. Cut 4 panels measuring 113 cm long and 10 cm tall.
- Fold the tabs in 2 width-wise. Only sew the large side.
- Reposition the tabs, place the seam at the centre and iron.
- Topstitch the long sides.
- Take a panel and position a tab, folded in 2 (vertically with the seam on the inside) at each edge of the panel, 1 cm from the edge. Repeat for the other tabs, the entire length of the panel.
- Place a second panel tab on top (face on face) sandwiching the tabs together.
- Stitch the 2 small sides and the large side where the tabs are fixed, beginning and stopping the seam 2 cm from the edges.
- Crimp the corners, press the seam open and turn the right way out.
- Make a tucked hem 1cm in from the sides (height) of the curtain. Sew.
- On the bottom of the panel at the top of the curtain, make a two cm tuck and mark it using an iron.
- Insert the curtain into the panel (by approximately 2 cm). Pin.
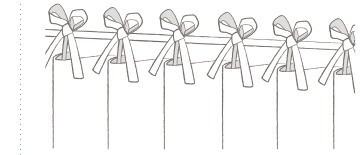
Curtains with knots
This curtain heading can be sewn. In this case, the tabs are tied around the rail or rings. This finish is intended more for pre-made panels made from fine and lightweight fabrics, with or without a lining.
Curtains hung on tension wire
These curtains are suitable for closing off shelves or the space underneath a desk, but can also be used on a window, with a net or lightweight fabric. Unlike with traditional curtains, curtains hung with screwed on hooks are easy to install and leave little trace. Their fitting requires that you attach brackets onto which a rigid cable is fitted.
Slide top curtains
The simplest of the curtain headings. A simple hem into which the curtain rail slides, for a natural wave.
Attaching a lining
- Cut the lengths of curtain and liner to the same length.
- Lay the fabrics out nice and flat.
- Prepare the hems at the bottom.
The hem at the bottom of the lining:
- Mark an initial 10 cm pleat and then a second 10 pleat.
- Iron the pleat flat.
- Stitch along the entire length of the first pleat.
The hem at the bottom of the curtain:
- Mark an initial 5 cm pleat and then a second 5 pleat.
- Iron the pleat flat.
- Stitch along the entire length of the first pleat.
Preparing the vertical edges:
- Cut 2cm width off the lining along the length of the vertical sides.
- Position the right side of the lining against the right side of the curtain. The lining should be centred on the curtain: verify that that the curtain overlaps the lining by 2 cm on both sides. The bottom of the lining should be positioned 4 cm from the bottom of the curtain.
- Pin the curtain and the lining together.
- Sew the entire curtain and its lining on the right side in line with the pins. Begin by sewing vertically up the first side, stopping 5 cm above the hem of the lining Do the same on the other side.
- Turn the curtain the right way out.
- Press the curtain, paying particular attention to the edges.
Prepare the hem at the bottom of the curtain.
- Fold the fabric at the two corners to create a bevelled shape.
- Use an iron to flatten them out.
- Iron and then sew the hem, right to the end.
- Sew the corners at the bottom of the curtain, at the side.
- Fold the hem at the top of the curtain down over the lining and stitch the lining and the curtain together width-wise.
- Position and attach the tape by sewing it to both layer (lining and curtain).
 France (Mainland and Corsica)


 Plain, double, tapered with a pompom or other decorative feature - tabs are an easy way to add a touch of interest. A different fabric can be used for the tabs for a sophisticated and original finish. This finish gives the curtain an even wave and an impeccable straight drop and is also equally suited for when making linings and net curtains. It is possible to buy ready-made strips for making tabs, or they can easily be made from scratch. Here we suggest a design that features a decorative panel at the top of the curtain. The values stated are intended as a rough guide. They can be adjusted to keep the curtains in proportion.